
Table of Contents
It happens to almost every driver eventually. You are cruising down the highway, listening to your favorite playlist, when suddenly, a symbol illuminates on your dashboard. Your heart skips a beat. Is it serious? Can you make it home, or is your engine about to explode? How to understand these warning lights?
Modern vehicles are marvels of engineering, essentially rolling computers equipped with hundreds of sensors that monitor everything from tire rotation speed to exhaust emissions. When one of these sensors detects an anomaly, it triggers the warning lights. While these glowing hieroglyphs are designed to help us, they often cause more confusion and anxiety than clarity.
Think of your dashboard not as a source of panic, but as a communication tool. This guide acts as your "decoder ring," translating the most common and critical warning symbols so you can react appropriately, save money on repairs, and stay safe on the road.
The Traffic Light Logic: Understanding Colors
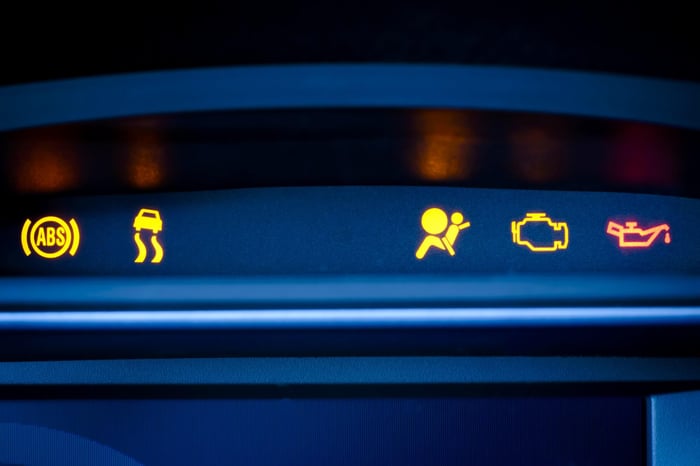
Before diving into specific symbols, it is crucial to understand the universal color-coding system manufacturers use. Much like traffic lights, the color of the icon indicates the urgency of the problem.
Red: Stop immediately (safely). A red light indicates a potentially catastrophic issue or a severe safety hazard. Driving with a red warning light can destroy your engine or put you in immediate physical danger.
Yellow or Orange: Caution required. These warning lights indicate that something is wrong and needs to be checked soon, but you are generally safe to finish your current drive. However, ignoring them can lead to larger, more expensive failures later.
Green or Blue: System active. These are not warning lights; they are indicators letting you know a system (like headlights, high beams, or cruise control) is currently on.
The Decoder Ring: Common Symbols Explained
Below is a breakdown of the most common—and most misunderstood—warning lights.
1. The Check Engine Light (CEL)
Symbol: An outline of an engine (often looks like a yellow submarine or a faucet).
What it means: This is the most ambiguous light on the dash because it covers a vast range of issues. It is triggered by the car’s On-Board Diagnostics (OBD) system when it detects a problem that affects the engine's operation or emissions.
Common Causes:
Loose Gas Cap: Believe it or not, a loose cap messes with the fuel system's pressure.
Oxygen (O2) Sensor: A faulty sensor can ruin your fuel economy.
Catalytic Converter: Ignoring a bad O2 sensor often leads to this expensive repair.
Spark Plugs/Ignition Coils: If the light is flashing, you likely have a misfire.
Action Plan: If the light is steady, you can keep driving, but get it scanned soon. If the light is flashing, pull over immediately. A flashing CEL indicates an active misfire that can dump raw fuel into the exhaust, permanently damaging the catalytic converter.
2. Oil Pressure Warning
Symbol: An old-fashioned oil can with a drop dripping from the spout.
What it means: This is arguably the most critical light on your dashboard. It does not necessarily mean you are low on oil (though that is a possibility); it means the engine has lost the oil pressure required to lubricate moving parts.
The Danger: Without oil pressure, metal grinds against metal. An engine can destroy itself in a matter of minutes—or even seconds—without proper lubrication.
Action Plan: Stop immediately. Do not try to drive to the nearest service station. Turn off the engine, check the oil dipstick, and add oil if it is low. If the oil level is normal but the light persists, call a tow truck. Starting the engine again could result in a total engine seizure.
3. Tire Pressure Monitoring System (TPMS)
Symbol: An exclamation point inside a horseshoe shape (representing the cross-section of a tire).
What it means: At least one of your tires is significantly under-inflated (usually by 25% or more).
Common Causes:
Puncture: A nail or debris causing a slow leak.
Seasonal Changes: Air contracts in cold weather. When the temperature drops rapidly in winter, tire pressure drops with it, often triggering this light even if there is no puncture.
Action Plan: Find an air pump immediately. Driving on an under-inflated tire causes heat buildup, which can lead to a dangerous blowout. It also significantly reduces your fuel economy and handling capabilities.
4. Battery / Charging Alert
Symbol: A rectangular battery with plus (+) and minus (-) signs.
What it means: Many drivers assume this means the battery is dead and needs replacement. However, it usually indicates that the charging system (the alternator) is failing and the car is running solely on battery power.
The Danger: Once the battery drains, the car will shut off and will not restart. You likely have very limited driving time left.
Action Plan: Turn off all non-essential electrical accessories (radio, AC, heated seats) to save power. Drive directly to a mechanic. Do not turn off the engine until you are in a safe place, as it may not start again.
5. Engine Temperature Warning
Symbol: A thermometer dipped in liquid (looks like a sailboat in water) or simply a red thermometer.
What it means: Your engine is overheating.
Common Causes: Low coolant levels, a leak in the radiator hoses, a stuck thermostat, or a broken water pump.
Action Plan: Pull over and turn off the engine to let it cool. Never attempt to remove the radiator cap while the engine is hot; the pressurized steam can cause severe burns If you continue driving an overheating car, you risk warping the cylinder head or blowing a head gasket—repairs that can cost thousands of dollars.
Quick Reference Summary Table
For a quick glance, here is how you should react to the "Big Three" warning lights:
Symbol | Name | Color Priority | Immediate Risk | Primary Action |
Engine Outline | Check Engine | Yellow (Caution) | Low to Moderate | Check gas cap; Scan for codes soon. |
Oil Can | Oil Pressure | Red (Urgent) | Critical | Stop driving immediately. Check oil level. |
Exclamation in Horseshoe | TPMS | Yellow (Caution) | Moderate | Check tire pressure; inflate to spec. |
Battery Box | Charging System | Red (Urgent) | High | Turn off accessories; drive to shop immediately. |
Thermometer | Temperature | Red (Urgent) | Critical | Pull over; let engine cool. Check coolant. |
Why You Should Never Ignore the Light
It is tempting to ignore a yellow dashboard light, especially if the car seems to be driving fine. This is known as "alert fatigue." However, vehicle systems are interconnected. A small problem, like a failing thermostat (Temperature Light), can lead to a massive problem, like a blown head gasket, if ignored.
Furthermore, ignoring lights like the TPMS or Check Engine light often results in "silent" costs. You may be burning 10% to 20% more fuel than necessary due to low tire pressure or a rich fuel mixture caused by a bad sensor.
Conclusion
Your dashboard is not designed to scare you; it is designed to save your car. By understanding the language of these symbols—specifically the difference between a yellow "check soon" and a red "stop now"—you can navigate car ownership with confidence.
The next time a light pops up, don't panic. Consult your decoder ring, check the color, and take the appropriate action. Your car (and your wallet) will thank you.